DD脚本合集 一键安装Windows/Debian/Ubuntu/CentOS
无需DD系统VPS通过Docker直接运行Windows,查看Windows Qemu镜像 >>
安装重装系统的前提组件
Debian/Ubuntu:
apt-get install -y xz-utils openssl gawk file wget screen && screen -S os
RedHat/CentOS:
yum install -y xz openssl gawk file glibc-common wget screen && screen -S os
如果出现异常,请刷新Mirrors缓存或更换镜像源。
RedHat/CentOS:
yum makecache && yum update -y
Debian/Ubuntu:
apt update -y && apt dist-upgrade -y
一键智能安装脚本
- 一键DD脚本,支持性好,更智能更全面,支持国内外各种VPS重装,特别是对国内各种访问国外资源慢的VPS安装有奇效。
- 支持debian11.
- 发现很多人不知道怎么DD甲骨文,使用支持uefi的镜像包即可.脚本已添加3个甲骨文专用选项23-25.
wget --no-check-certificate -O AutoReinstall.sh https://d.02es.com/AutoReinstall.sh && chmod a+x AutoReinstall.sh && bash AutoReinstall.sh

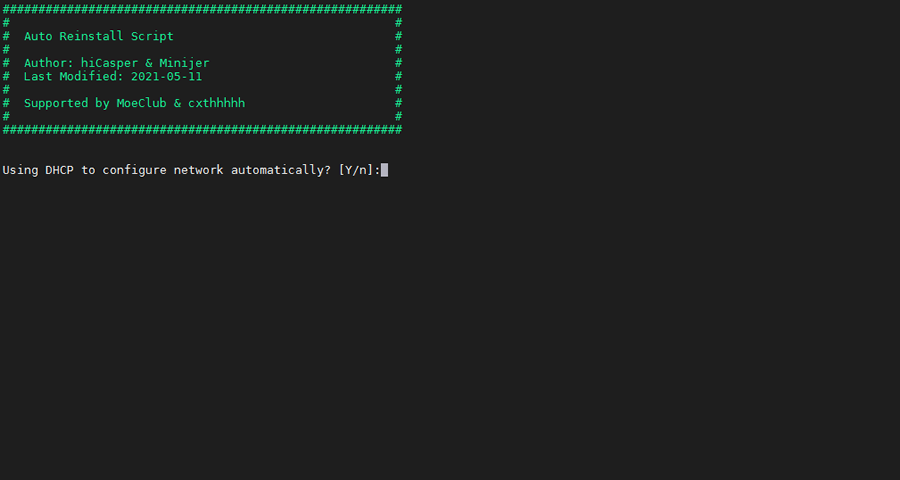
输入Y确认DD后主机自动获取IP,N则自行设置IP 输入N后会自动检测出主机现用IP,如果正确可以按Y确认使用,如不正确则按N自行按正确的输入。

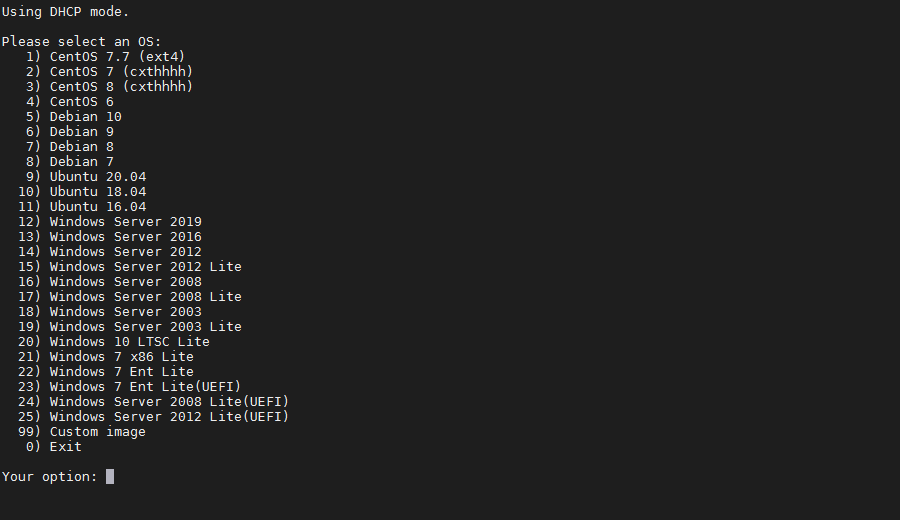
25合1的系统一键DD选择界面,输入99则使用自定义镜像。 以上系统密码不为默认密码的均为网络收集,如有疑虑使用自己的自定义镜像。
25合一系统密码:
1、CentOS 7.7 (已关闭防火墙及SELinux,默认密码Pwd@CentOS)
2、CentOS 7 (默认密码cxthhhhh.com)
3、CentOS 8 (默认密码cxthhhhh.com)
4、CentOS 6 (默认密码Minijer.com)
5、Debian 11 (默认密码Minijer.com)
6、Debian 10 (默认密码Minijer.com)
7、Debian 9 (默认密码Minijer.com)
8、Debian 8 (默认密码Minijer.com)
9、Ubuntu 20.04 (默认密码Minijer.com)
10、Ubuntu 18.04 (默认密码Minijer.com)
11、Ubuntu 16.04 (默认密码Minijer.com)
12、Windows Server 2019 (默认密码cxthhhhh.com)
13、Windows Server 2016 (默认密码cxthhhhh.com)
14、Windows Server 2012 (默认密码cxthhhhh.com)
15、Windows Server 2012 Lite (默认密码nat.ee)
16、Windows Server 2008 (默认密码cxthhhhh.com)
17、Windows Server 2008 Lite (默认密码nat.ee)
18、Windows Server 2003 (默认密码cxthhhhh.com)
19、Windows Server 2003 Lite (默认密码WinSrv2003x86-Chinese)
20、Windows 10 LTSC Lite (默认密码www.nat.ee)
21、Windows 7 x86 Lite (默认密码Windows7x86-Chinese)
22、Windows 7 Ent Lite (默认密码nat.ee)
23、Windows 7 Ent Lite (UEFI支持甲骨文)(默认密码nat.ee)
24、Windows Server 2008 Lite (UEFI支持甲骨文)(默认密码nat.ee)
25、Windows Server 2012 Lite (UEFI支持甲骨文)(默认密码nat.ee)
99、自定义镜像
注意:
经测试在谷歌云原版系统基础上DD会出现自动获取的子网掩码为255.255.255.255,如出现这种情况需要手工输入改正为正确的如255.255.255.0,否则会安装完成主机可能会离线。
Oracle Cloud(甲骨文云)可选择23-25一键DD,注意基础系统最好选择Ubuntu,如原系统是CentOS可能无法成功。
萌咖一键安装脚本
实测支持virmach系统下直接dd系统.
全自动安装默认root密码:MoeClub.org,安装完成后请立即更改密码.
能够全自动重装Debian/Ubuntu/CentOS等系统.
同时提供dd安装镜像功能,例如: 全自动无救援dd安装windows系统
全自动安装CentOS时默认提供VNC功能,可使用VNC Viewer查看进度,
VNC端口为 1 或者 5901 ,可自行尝试连接.(成功后VNC功能会消失.)
目前CentOS系统只支持任意版本重装为 CentOS 6.x 及以下版本.
特别注意:OpenVZ构架不适用.
wget --no-check-certificate -qO InstallNET.sh 'https://d.02es.com/InstallNET.sh' && chmod +x InstallNET.sh
# bash InstallNET.sh +安装命令
DD debian 10示例
wget --no-check-certificate -qO InstallNET.sh 'https://d.02es.com/InstallNET.sh' && bash InstallNET.sh -d 10 -v 64 -p "自定义root密码" -port "自定义ssh端口"
DD ubuntu 20.04示例
wget --no-check-certificate -qO InstallNET.sh 'https://d.02es.com/InstallNET.sh' && bash InstallNET.sh -u 20.04 -v 64 -p "自定义root密码" -port "自定义ssh端口"
下载及说明:
Usage:
        bash InstallNET.sh      -d/--debian [dist-name]
                                -u/--ubuntu [dist-name]
                                -c/--centos [dist-version]
                                -v/--ver [32/i386|64/amd64]
                                --ip-addr/--ip-gate/--ip-mask
                                -apt/-yum/--mirror
                                -dd/--image
                                -a/-m

# dist-name: 发行版本代号
# dist-version: 发行版本号
# -apt/-yum/--mirror : 使用定义镜像
# -a/-m : 询问是否能进入VNC自行操作. -a 为不提示(一般用于全自动安装), -m 为提示.
使用示例:
#使用默认镜像全自动安装
bash InstallNET.sh -d 8 -v 64 -a
bash InstallNET.sh -d 9 -v 64 -a
bash InstallNET.sh -d 10 -v 64 -a
分别表示自动安装Debian 8x64  9x64 10x64

#使用自定义镜像全自动安装
bash InstallNET.sh -c 6.9 -v 64 -a --mirror 'http://mirror.centos.org/centos'


# 以下示例中,将X.X.X.X替换为自己的网络参数.
# --ip-addr :IP Address/IP地址
# --ip-gate :Gateway   /网关
# --ip-mask :Netmask   /子网掩码

#使用自定义镜像自定义网络参数全自动安装
#bash InstallNET.sh -u 16.04 -v 64 -a --ip-addr x.x.x.x --ip-gate x.x.x.x --ip-mask x.x.x.x --mirror 'http://archive.ubuntu.com/ubuntu'

#使用自定义网络参数全自动dd方式安装
#bash InstallNET.sh --ip-addr x.x.x.x --ip-gate x.x.x.x --ip-mask x.x.x.x -dd 'https://moeclub.org/get-win7embx86-auto'

#使用自定义网络参数全自动dd方式安装存储在谷歌网盘中的镜像(调用文件ID的方式)
#bash InstallNET.sh --ip-addr x.x.x.x --ip-gate x.x.x.x --ip-mask x.x.x.x -dd "$(echo "1cqVl2wSGx92UTdhOxU9pW3wJgmvZMT_J" |xargs -n1 bash <(wget --no-check-certificate -qO- 'https://moeclub.org/get-gdlink'))"

#使用自定义网络参数全自动dd方式安装存储在谷歌网盘中的镜像
#bash InstallNET.sh --ip-addr x.x.x.x --ip-gate x.x.x.x --ip-mask x.x.x.x -dd "$(echo "https://drive.google.com/open?id=1cqVl2wSGx92UTdhOxU9pW3wJgmvZMT_J" |xargs -n1 bash <(wget --no-check-certificate -qO- 'https://moeclub.org/get-gdlink'))"
自定义DD包地址
示例脚本,补全DD包直连地址后运行即可;
# DD Windows Server 2008 R2 64位 精简版 [账户Administrator密码nat.ee]
wget --no-check-certificate -qO InstallNET.sh 'https://d.02es.com/InstallNET.sh' && bash InstallNET.sh -dd 'https://d.02es.com/Windows/Win_Server2008R2_sp1_64_Administrator_nat.ee.gz'

# DD Windows Server 2012 R2 64位 精简版 [账户Administrator密码nat.ee]
wget --no-check-certificate -qO InstallNET.sh 'https://d.02es.com/InstallNET.sh' && bash InstallNET.sh -dd 'https://d.02es.com/Windows/Win_Server2012R2_64_Administrator_nat.ee.gz'

# DD Windows Server 2016 64位 精简版 [账户Administrator密码nat.ee]
wget --no-check-certificate -qO InstallNET.sh 'https://d.02es.com/InstallNET.sh' && bash InstallNET.sh -dd 'https://d.02es.com/Windows/Win_Server2016_64_Administrator_nat.ee.gz'

# DD Windows Server 2019 64位 精简版 [账户Administrator密码WinSrv2019dc-Chinese]
wget --no-check-certificate -qO InstallNET.sh 'https://d.02es.com/InstallNET.sh' && bash InstallNET.sh -dd 'https://d.02es.com/Windows/Win_Server2019_64_Administrator_WinSrv2019dc-Chinese.gz'

# DD Windows Server 2022 64位 精简版 [账户Administrator密码nat.ee]
wget --no-check-certificate -qO InstallNET.sh 'https://d.02es.com/InstallNET.sh' && bash InstallNET.sh -dd 'https://d.02es.com/Windows/Win_Server2022_64_Administrator_nat.ee.gz'

# DD Windows Server 2022 64位 DataCenter版 [账户Administrator密码DataCenter]
wget --no-check-certificate -qO InstallNET.sh 'https://d.02es.com/InstallNET.sh' && bash InstallNET.sh -dd 'https://d.02es.com/Windows/Disk_Windows_Server_2022_DataCenter_CN_v2.12.vhd.gz'

# DD Windows7 32位 精简版 [账户Administrator密码nat.ee]
wget --no-check-certificate -qO InstallNET.sh 'https://d.02es.com/InstallNET.sh' && bash InstallNET.sh -dd 'https://d.02es.com/Windows/Win7_86_Administrator_nat.ee.gz'

# DD Windows7 sp1 64位 企业精简版 [账户Administrator密码nat.ee]
wget --no-check-certificate -qO InstallNET.sh 'https://d.02es.com/InstallNET.sh' && bash InstallNET.sh -dd 'https://d.02es.com/Windows/Win7_sp1_64_Administrator_nat.ee.gz'

# DD Windows8.1 64位 专业精简版 [账户Administrator密码nat.ee]
wget --no-check-certificate -qO InstallNET.sh 'https://d.02es.com/InstallNET.sh' && bash InstallNET.sh -dd 'https://d.02es.com/Windows/Win8.1_64_Administrator_nat.ee.gz'

# DD Windows10 2016LTSB 64位 企业深度精简版 [账户Administrator密码nat.ee]
wget --no-check-certificate -qO InstallNET.sh 'https://d.02es.com/InstallNET.sh' && bash InstallNET.sh -dd 'https://d.02es.com/Windows/Win10_2016LTSB_64_Administrator_nat.ee.gz'

# DD Windows10 2019LTSC 64位 企业适量精简版 [账户Administrator密码Vicer]
wget --no-check-certificate -qO InstallNET.sh 'https://d.02es.com/InstallNET.sh' && bash InstallNET.sh -dd 'https://d.02es.com/Windows/Win10_2019LTSC_64_Administrator_Vicer.gz'
精简版DD包
如果没有自己的DD包,可以使用博主提供的包,从以下版本中选择自己需要的系统,然后输入一键脚本即可;
# DD Windows Server 2008 R2 64位 精简版 [账户Administrator密码nat.ee]
wget --no-check-certificate -qO InstallNET.sh 'https://d.02es.com/InstallNET.sh' && bash InstallNET.sh -dd 'https://d.02es.com/Windows/Win_Server2008R2_sp1_64_Administrator_nat.ee.gz'

# DD Windows Server 2012 R2 64位 精简版 [账户Administrator密码nat.ee]
wget --no-check-certificate -qO InstallNET.sh 'https://d.02es.com/InstallNET.sh' && bash InstallNET.sh -dd 'https://d.02es.com/Windows/Win_Server2012R2_64_Administrator_nat.ee.gz'

# DD Windows Server 2016 64位 精简版 [账户Administrator密码nat.ee]
wget --no-check-certificate -qO InstallNET.sh 'https://d.02es.com/InstallNET.sh' && bash InstallNET.sh -dd 'https://d.02es.com/Windows/Win_Server2016_64_Administrator_nat.ee.gz'

# DD Windows Server 2019 64位 精简版 [账户Administrator密码WinSrv2019dc-Chinese]
wget --no-check-certificate -qO InstallNET.sh 'https://d.02es.com/InstallNET.sh' && bash InstallNET.sh -dd 'https://d.02es.com/Windows/Win_Server2019_64_Administrator_WinSrv2019dc-Chinese.gz'

# DD Windows Server 2022 64位 精简版 [账户Administrator密码nat.ee]
wget --no-check-certificate -qO InstallNET.sh 'https://d.02es.com/InstallNET.sh' && bash InstallNET.sh -dd 'https://d.02es.com/Windows/Win_Server2022_64_Administrator_nat.ee.gz'

# DD Windows Server 2022 64位 DataCenter版 [账户Administrator密码DataCenter]
wget --no-check-certificate -qO InstallNET.sh 'https://d.02es.com/InstallNET.sh' && bash InstallNET.sh -dd 'https://d.02es.com/Windows/Disk_Windows_Server_2022_DataCenter_CN_v2.12.vhd.gz'

# DD Windows7 32位 精简版 [账户Administrator密码nat.ee]
wget --no-check-certificate -qO InstallNET.sh 'https://d.02es.com/InstallNET.sh' && bash InstallNET.sh -dd 'https://d.02es.com/Windows/Win7_86_Administrator_nat.ee.gz'

# DD Windows7 sp1 64位 企业精简版 [账户Administrator密码nat.ee]
wget --no-check-certificate -qO InstallNET.sh 'https://d.02es.com/InstallNET.sh' && bash InstallNET.sh -dd 'https://d.02es.com/Windows/Win7_sp1_64_Administrator_nat.ee.gz'

# DD Windows8.1 64位 专业精简版 [账户Administrator密码nat.ee]
wget --no-check-certificate -qO InstallNET.sh 'https://d.02es.com/InstallNET.sh' && bash InstallNET.sh -dd 'https://d.02es.com/Windows/Win8.1_64_Administrator_nat.ee.gz'

# DD Windows10 2016LTSB 64位 企业深度精简版 [账户Administrator密码nat.ee]
wget --no-check-certificate -qO InstallNET.sh 'https://d.02es.com/InstallNET.sh' && bash InstallNET.sh -dd 'https://d.02es.com/Windows/Win10_2016LTSB_64_Administrator_nat.ee.gz'

# DD Windows10 2019LTSC 64位 企业适量精简版 [账户Administrator密码Vicer]
wget --no-check-certificate -qO InstallNET.sh 'https://d.02es.com/InstallNET.sh' && bash InstallNET.sh -dd 'https://d.02es.com/Windows/Win10_2019LTSC_64_Administrator_Vicer.gz'
救援模式下直接DD系统镜像
进入救援模式,连接救援模式下的服务器,首先执行以下命令:
fdisk -l
找到与系统硬盘容量匹配的盘位置名称,替换下方的“sda”,同时替换“DD ISO URL”为 DD 镜像的地址
wget -O- "DD ISO URL" | gunzip | dd of=/dev/sda
例如:wget -O- "http://d.02es.com/win/lite/win7-ent-sp1-x64-cn/win7-ent-sp1-x64-cn.vhd.gz" --no-check-certificate | gunzip | dd of=/dev/vda
准备完毕,执行替换后的命令开始 DD 系统。 注意在 DD 完成后,要再次返回后台,退出救援模式,等待 DD 后的系统启动即可。有些设备可能需要连接VNC,手动配置IP信息。
精简版win2016、2019 DD镜像(3.3GB~3.8GB) - From Teddysun
进入救援模式,连接救援模式下的服务器,首先执行以下命令:
fdisk -l
找到与系统硬盘容量匹配的盘位置名称,替换下方的“sda”,以下包含两种语言的win系统,可根据需要自主选择:
wget -O- "https://d.02es.com/os/cn_win2016.xz" --no-check-certificate | xzcat | dd of=/dev/sda
wget -O- "https://d.02es.com/os/cn_win2019.xz" --no-check-certificate | xzcat | dd of=/dev/sda
wget -O- "https://d.02es.com/os/en_win2016.xz" --no-check-certificate | xzcat | dd of=/dev/sda
wget -O- "https://d.02es.com/os/en_win2019.xz" --no-check-certificate | xzcat | dd of=/dev/sda
Windows服务器开启Ping功能
打开系统运行服务 Win+R 输入命令
## 开启Ping
netsh firewall set icmpsetting 8
## 关闭Ping
netsh firewall set icmpsetting 8 disable
常用工具下载
密码为根域名
https://d.02es.com/tool.zip
特别感谢:Vicer、cxt、hiCasper、Teddysun等各位技术大佬的脚本,站长只是脚本的"搬运工"。
版权申明:以上所有脚本、系统均为网络收集,站长不对资源的安全及版权纠纷负责,如有侵犯您的权益欢迎联系。

